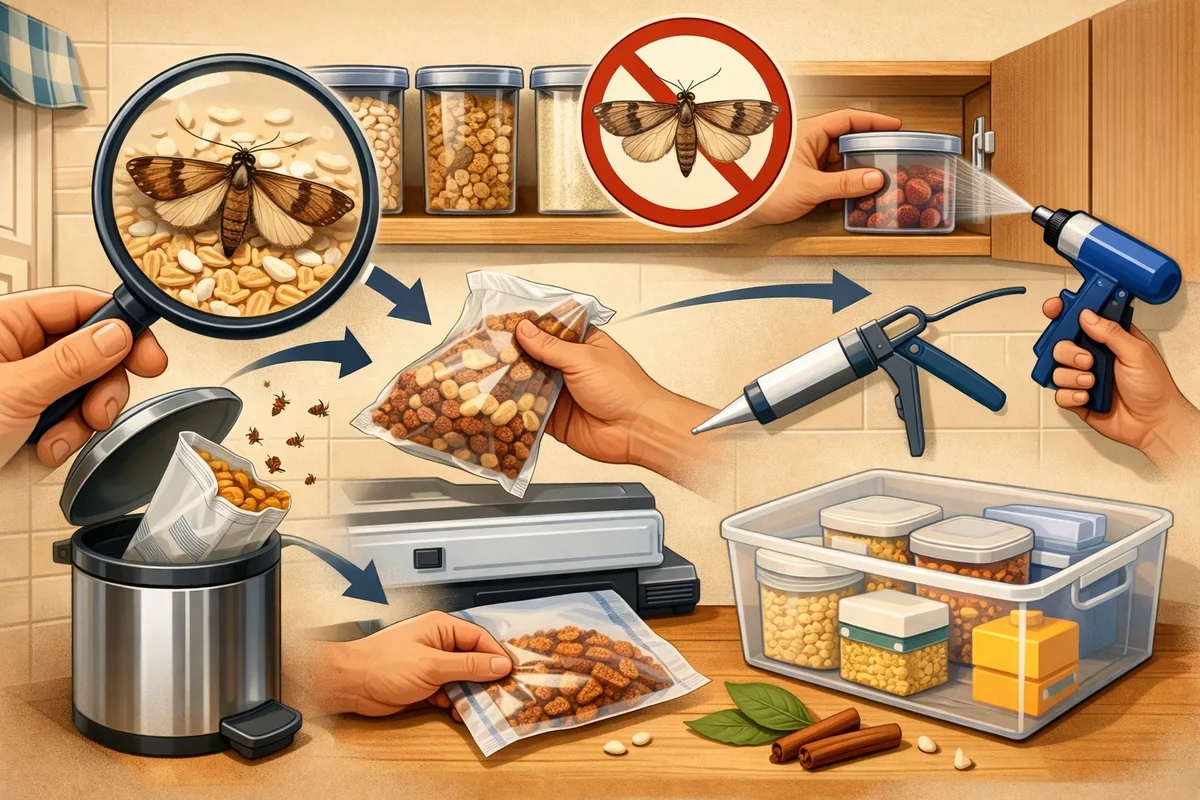

How to Prevent Pests in the Pantry: Food Storage Tips for 2026
Learn proven strategies to prevent pantry pests in 2026. Step-by-step cleaning, airtight storage, and food rotation tips to keep your pantry pest-free - no professional help needed.
To prevent pests in the pantry, seal all food in airtight containers, regularly inspect for signs of infestation, and deep-clean shelves and corners at least monthly. The process takes 1-2 hours for a thorough reset and is manageable for most homeowners. Consistent food storage habits are the key to long-term pantry pest prevention.
Why Pantry Pests Are a Serious Problem
Pantry pests aren't just an annoyance - they can ruin entire batches of food and cost you real money. Many infestations start unnoticed and spiral quickly, especially in warm, humid climates. Prevention is far less stressful than dealing with a full-blown outbreak.
Common Pantry Pests and Their Impact
The usual suspects include Indian meal moths, flour beetles, and weevils. These insects lay eggs in dry goods like flour, rice, cereal, and even pet food. The larvae feed inside your food, leaving behind webbing, droppings, and live insects you often don't see until it's too late.
When these pests show up, you can lose entire bags or boxes of groceries - sometimes before you've even opened them. For people with allergies or asthma, fragments from pantry pests can make symptoms much worse. That's why prevention is worth prioritizing from day one.
How Pantry Infestations Start
Most infestations begin with contaminated groceries - sometimes straight from the store or bulk bin. Eggs and larvae are invisible to the naked eye, so you won't notice them until adults emerge weeks later. Once inside your pantry, warm and humid conditions let pests multiply quickly, especially if food is stored in thin or open packaging.
Improper storage - like leaving flour in its original paper bag or stacking foods directly on wooden shelves - creates ideal conditions for pests to thrive. Even a single overlooked spill can attract beetles and moths. That's why airtight storage is the backbone of every effective pantry pest prevention plan.
If you're looking for product-based solutions that are safe for food areas, see the Best Pest Control Products for Kitchens 2026 for detailed recommendations.
Signs You Have a Pantry Pest Problem
Spotting a pantry pest infestation early means you can stop it before it spreads. The trick is knowing what to look for - not every sign is obvious.
Visual Clues in Food and Packaging
Webbing in the corners of flour bags, clumped grains, or a fine powdery dust are early signs of insect activity. You might see tiny brown or reddish beetles crawling inside containers or a small moth fluttering near pantry lights at night. Pinholes or chewed edges on boxes and bags are clear evidence of pest entry.
Unusual Odors and Other Subtle Hints
Infested products often smell musty or oily - those odors come from pest secretions and breakdown of food. Larvae and eggs are usually hidden deep inside packaging, so a quick glance won't always reveal the problem. If you notice a sudden increase in small moths or beetles near your pantry, especially after dark, take it as a warning to inspect all your dry goods.
For a more detailed overview of pest types and their typical signs in kitchens and pantries, check Kitchen & Pantry Pest Control for additional identification tips.
How Pantry Pests Get In: Entry Points and Risk Factors
Understanding how pests get into your pantry is half the battle. Most infestations start at the grocery store or market, but your home's structure and pantry setup can make things much worse - or much better.
Contaminated Groceries and Bulk Foods
Eggs and larvae hitchhike in flour, rice, pasta, pet food, and dried fruits. Buying from open bins or in bulk raises your risk, especially with high-turnover stores where inventory isn't checked as often. Organic and minimally processed foods, while healthy, have fewer preservatives and are more likely to attract pests or harbor eggs.
Always check packaging for small holes or tears before buying. If you're shopping in bulk, transfer goods to sealed containers immediately at home - don't leave them in store packaging, even for a day.
Structural Gaps and Poor Pantry Design
Cracks around shelves, gaps in baseboards, and unsealed joints offer perfect hiding places for pantry pests to lay eggs and multiply. Older homes with wooden shelves or baseboards are especially vulnerable. Poor ventilation keeps humidity high, which speeds up pest reproduction cycles and increases your risk of infestation.
Step-by-Step: How to Clean and Reset an Infested Pantry
If you've found signs of pantry pests, it's time for a deep clean. The reset process is straightforward but requires attention to detail - miss a corner, and you'll be fighting a new wave in days.
Safe Disposal of Contaminated Foods
Double-bag anything infested and take it straight outside to your main garbage bin. Don't compost infested food - pest eggs and larvae can survive and reinfest your kitchen or garden. If you aren't sure about an item, freeze it for at least 72 hours before disposal to ensure all stages of pests are killed.
Deep Cleaning Techniques That Work
Vacuum every shelf, corner, and crack - this removes eggs and debris that wiping alone can't reach. Follow up with hot, soapy water, then wipe surfaces with white vinegar to kill odors and disrupt pest pheromones. Skip bleach; it's not effective on pest eggs and can damage wood or paint.
How to Prevent Reinfestation During Cleaning
Seal all remaining food in airtight containers before you start cleaning - otherwise, pests will simply move. Check trash cans, nearby storage, and adjacent rooms for missed sources. Let all shelves dry completely before restocking to prevent mold and keep pests from finding a new foothold.
Step-by-Step Guide
Follow these steps to prevent common pantry pests by using modern food storage best practices. This guide covers preparation, cleaning, and storage techniques to keep your pantry pest-free.
Total Time
45 minutes
Difficulty
Beginner
Empty and Inspect All Pantry Items
Remove every item from your pantry shelf by shelf. Carefully inspect each package or container for pests, webbing, or damage. This allows you to identify infested items early and prevents pests from spreading to new foods.
Pro Tips:
- Use a flashlight to check corners and crevices for hidden insects.
- Dispose of any food with holes, webbing, or visible insects in a sealed bag.
- Work one shelf at a time to avoid misplacing items.
Important Warnings:
- Never return infested items to the pantry—this can quickly lead to a full infestation.
Required Tools:
- Flashlight
- Garbage bags
Thoroughly Clean Pantry Surfaces
Vacuum shelves, corners, and floor areas to remove crumbs, food residue, and insect eggs. Follow up by wiping all surfaces with warm, soapy water. This removes attractants and destroys pest eggs, reducing the risk of reinfestation.
Pro Tips:
- Use a crevice tool on your vacuum for tight spots.
- Let all surfaces dry completely before returning items.
- Pay special attention to shelf joints and cracks.
Important Warnings:
- Avoid using harsh chemicals near food storage areas—residue can contaminate food.
- Common mistake: Skipping vacuuming allows eggs and larvae to remain.
Required Tools:
- Vacuum cleaner with attachments
- Mild dish soap
- Sponges or microfiber cloths
- Bucket
Transfer Foods to Airtight Containers
Place all grains, flours, cereals, nuts, and dried fruits into airtight containers made of glass, heavy plastic, or metal. This creates a physical barrier pests cannot penetrate and preserves food freshness.
Pro Tips:
- Label containers with contents and purchase date for easy rotation.
- Choose containers with rubber gaskets for maximum seal.
- Store new purchases in the back and older ones in front.
Important Warnings:
- Do not reuse containers that previously held infested food—clean thoroughly before reuse.
Required Tools:
- Airtight food storage containers (glass, BPA-free plastic, or metal)
- Permanent marker or labels
Seal Entry Points and Maintain Pantry Hygiene
Inspect pantry walls, shelves, and baseboards for cracks or gaps, sealing any openings with caulk. Sweep up spills immediately and perform weekly checks for crumbs or leaks. Consistent hygiene is the most effective long-term pest prevention.
Pro Tips:
- Install door sweeps to block pest entry at the base.
- Check behind and beneath appliances for hidden food debris.
- Schedule a monthly deep clean for lasting results.
Important Warnings:
- Failing to seal entry points allows pests to reinvade, even with perfect storage.
- If you notice ongoing infestations despite these steps, consult a licensed pest control professional.
Required Tools:
- Silicone caulk and caulking gun
- Broom and dustpan
- All-purpose cleaner
Choosing the Right Food Storage Containers
The right container is your first and best defense against pantry pests. Not all “airtight” containers are created equal, and some materials work better than others.
Airtight Plastic vs. Glass: Which Is Better?
Glass jars with screw-on or clamp-down lids are as close to pest-proof as it gets - nothing chews through glass, and a good seal keeps out even tiny beetles. High-quality plastic containers with silicone gaskets also block pests effectively, as long as they remain undamaged. Over time, plastic can warp or crack (especially in sunlight or with heavy use), while glass is heavier and breakable but lasts indefinitely if handled carefully.
What to Avoid: Flimsy Packaging and DIY Solutions
Original paper, cardboard, or thin plastic bags offer little to no protection - most pantry pests chew right through them. Repurposed containers without tight-fitting lids (like takeout tubs or reused yogurt cups) often leak or warp, giving pests a way in. Mason jars with metal lids are a reliable, affordable upgrade from snap-on plastic lids, especially for flours, grains, and spices.
Best Practices for Storing and Rotating Pantry Foods
Storing food properly and using it in the right order stops infestations before they start. It's about making inspection and cleaning easy, not just neatness for its own sake.
How to Organize for Maximum Pest Prevention
- Keep oldest items at the front of the shelf - use “first in, first out” so nothing sits forgotten in the back.
- Group similar items together (flours, sugars, pastas) to simplify inspection and cleaning.
- Store food at least 2 inches off the floor and a few inches from the wall to reduce hiding places for pests.
Optimal Storage Conditions for Different Foods
- Keep pantry temperatures below 70°F to slow pest development.
- Store whole grains and nuts in the fridge or freezer if you'll keep them more than a month - they're prime targets for pests.
- Pet food and birdseed belong in sealed bins, ideally outside the main pantry or even in a separate room.
Natural and Chemical Deterrents: What Works and What Doesn’t
Many people try “natural” deterrents before considering traps or pesticides. Some work in the short term, but none replace airtight storage and regular cleaning.
Bay Leaves, Essential Oils, and Herbal Repellents
Bay leaves, cloves, and certain essential oils (like peppermint or eucalyptus) can mask the smell of food and deter some insects. However, their effect is mild and varies by pest type and how often you replenish them. No herbal remedy kills eggs or larvae - at best, these methods make your pantry less attractive but won't solve an infestation.
When to Use Pesticide Strips or Traps
Pheromone traps are a solid tool for monitoring and reducing adult pantry moths; they're species-specific and help you spot a problem early. Pesticide strips release vapors that kill insects but must be used with caution - never with food exposed, and always follow label safety instructions. Remember, these tools only target adults, not eggs or larvae hidden in food, so combine them with deep cleaning for real results.
Preventing Future Infestations: Long-Term Strategies
Once your pantry is clean and sealed, the goal is to keep it that way for the long haul. A little routine goes a long way in keeping pests out for good.
Routine Inspection and Maintenance
- Do a full check of all pantry foods and containers every month - look for webbing, clumped grains, or live insects.
- Wipe down shelves and vacuum corners monthly to remove stray eggs and food debris.
- Keep a simple inventory or mark purchase dates so you use up older items first and don't forget about them.
Buying and Storing Groceries Safely
- Inspect packages for damage or holes before you buy - return anything suspicious to the store.
- Freeze new flours, grains, or nuts for 72 hours before storing to kill hidden eggs.
- Transfer all dry goods to airtight containers as soon as you bring them home - never leave them in original packaging.
Frequently Asked Questions About Pantry Pest Prevention
❓ Frequently Asked Questions
What is pantry pest prevention?
What is pantry pest prevention?
Pantry pest prevention involves storing food in airtight containers, cleaning shelves regularly, and maintaining low humidity to deter insects like moths and beetles. This helps reduce food waste and protects against contamination. For example, sealing dry goods in glass jars significantly lowers the risk of infestation.
How do I store grains to prevent pantry pests?
How do I store grains to prevent pantry pests?
To store grains safely and keep pests away:
- Transfer grains to airtight glass or thick plastic containers immediately after purchase
- Store containers in a cool, dry area below 75°F
- Wipe down shelves monthly to remove food residue
- Check for signs of pests before refilling
Airtight storage is the most effective long-term barrier.
What should I look for when choosing pantry storage containers?
What should I look for when choosing pantry storage containers?
When choosing pantry storage containers, consider:
- Material: glass or BPA-free plastic resists pest entry
- Seal: airtight gaskets prevent insect access
- Size: match container to food volume for minimal air space
- Ease of cleaning: wide openings help prevent residue buildup
Airtight seals are most important for pest prevention.
How often should I clean my pantry to avoid pest infestations?
How often should I clean my pantry to avoid pest infestations?
Clean your pantry every 1-2 months to help prevent pest infestations. Wipe all surfaces, check for spilled food, and inspect containers for signs of damage. Most users find that regular cleaning significantly reduces the risk of moths or beetles. Pay extra attention to corners and shelf edges, where crumbs collect.
Why do pantry pests keep coming back even after cleaning?
Why do pantry pests keep coming back even after cleaning?
Pantry pests often return if infested food items remain or if containers are not fully sealed. Eggs and larvae can survive unnoticed in packaging seams. Industry standards recommend discarding all affected food, vacuuming shelves, and switching to airtight containers to break the pest cycle.
Which foods are most susceptible to pantry pests?
Which foods are most susceptible to pantry pests?
Foods most susceptible to pantry pests include:
- Flour, grains, and cereals: high in starch, easy for larvae to penetrate
- Dried fruit and nuts: natural sugars attract insects
- Pet food: often stored in original, non-sealed packaging
Sealed, airtight containers help protect these high-risk foods.
How do I get rid of pantry pests without chemicals?
How do I get rid of pantry pests without chemicals?
To remove pantry pests naturally:
- Discard all infested food immediately
- Vacuum shelves and corners thoroughly
- Wipe down surfaces with soap and warm water
- Store all new food in airtight containers
- Freeze dry goods for 72 hours to kill any hidden eggs
This method minimizes chemical exposure.
When is the best time to inspect the pantry for pests?
When is the best time to inspect the pantry for pests?
The best time to inspect your pantry for pests is at the start of each season or before buying bulk food. Warmer months increase pest activity, so check food containers for holes or webbing regularly. Early detection allows for quick intervention and reduces the likelihood of widespread infestation.
Key Takeaways for Pantry Pest Prevention
Preventing pantry pests is all about airtight storage, regular cleaning, and being vigilant with new groceries. If pests return, repeat cleaning and inspection immediately - don't wait for the problem to get worse. For persistent, large-scale infestations that don't respond to DIY steps, professional help may be necessary.
Monthly maintenance and proper rotation of pantry goods stop most infestations before they start. Investing a little time up front saves you the headache, waste, and cost of dealing with contaminated food. Consistency is the real secret to a pest-free pantry.
Ready to put these steps into action? Start with the cleaning process and airtight storage upgrades today, and enjoy a safer, pest-free kitchen for the rest of 2026 and beyond.
Related Articles
Best Kitchen Pest Control Products 2026: Ant, Roach, Moth & Fly Solutions
Find the best kitchen pest control products for 2026, including safe ant baits, cockroach gels, pantry moth traps, fly solutions, and natural options. Expert advice on choosing safe, effective, and budget-friendly pest killers for food storage areas.
Complete Guide to Pest Prevention in Homes: Stop Pests in 2026
Protect your home in 2026 with this complete pest prevention guide. Discover proven DIY methods, room-by-room tips, safe solutions for families, and expert advice to stop pests before they start.
Best Ant Killers for Home Use 2026: Top Baits, Sprays, and Natural Options Compared
Discover the best ant killers for home use in 2026. Compare top baits, sprays, natural options, and expert tips for safe, effective ant control - without hiring an exterminator.
Best Cockroach Killers for Home 2026: Gels, Baits, Sprays & More
Find the best cockroach killers for home in 2026. Compare top gel baits, sprays, traps, and natural options for effective, safe, and budget-friendly cockroach removal - plus tips for choosing the right product for your needs.