
How to Rodent-Proof Your Home: Step-by-Step Guide (2026)
Learn how to rodent-proof your home in 2026 with this step-by-step exclusion guide. Discover proven DIY methods to seal out mice and rats, prevent infestations, and keep your home safe - without hiring an exterminator.
Why Rodent-Proofing Matters for Every Home
If you think a few mice aren't a big deal, think again. Rodents bring more than just annoyance - they pose real risks to your health and your wallet. Learning how to rodent-proof your home is one of the most effective ways to protect your space and avoid expensive repairs.
Health and Safety Risks from Rodents
Rodents can transmit diseases like hantavirus and salmonella through their droppings and urine, which often end up in hidden areas like behind appliances or inside cabinets. Breathing in dust contaminated by rodent waste increases the risk for respiratory illnesses. Even if you never see them, their presence can affect indoor air quality and safety.
Chewing on wires is another big issue - rodents love to gnaw, and exposed wiring can lead to electrical shorts or fires, especially in older homes where insulation may already be compromised. Infestations usually remain hidden until contamination is widespread, so early prevention is crucial.
Cost of Damage vs DIY Prevention
Rodents do more damage than most people realize. They chew insulation, drywall, pipes, and even ductwork, leading to hundreds or thousands of dollars in repair costs if left unchecked. Replacing chewed wires or ruined insulation adds up fast.
Professional remediation is costly, and most homeowners' insurance policies exclude rodent-related damage. DIY rodent exclusion usually costs far less - often just the price of materials and a few hours of your time. Preventing infestations always beats paying for major cleanup later.
If you want more in-depth strategies for prevention, check out our Rodent-Proofing & Prevention resource for a broader overview.
Identifying Signs of Rodent Activity Indoors and Out
Catching an infestation early is half the battle. Rodents are stealthy, so knowing the signs - both indoors and outdoors - can save you from a bigger headache.
Common Indoor Indicators
Fresh droppings are dark, moist, and pellet-shaped, while older droppings look grey and crumbly. You'll often find these behind appliances, inside cabinets, or in pantry corners. If you see droppings, it's a clear sign rodents are active.
Gnaw marks on food packaging, baseboards, or even electrical wiring are another giveaway. Mice have to gnaw constantly to keep their teeth from overgrowing. Noises at night - scratching or scampering in walls or ceilings - usually mean rodents have already moved in.
Outdoor Warning Signs
Burrows near the foundation, under porches, or beneath decks often signal outdoor nesting. These are usually 2-4 inches wide and may have fresh dirt piled nearby. Grease marks along pipes or walls result from rodents' oily fur rubbing against surfaces as they travel their usual routes.
Check for chewed holes near vents, doors, or utility lines - these often start small but grow quickly. If you see any of these signs outside, there's a good chance rodents are close to getting indoors, if they haven't already.
For a breakdown of the most effective products and materials to use, see our guide to Best Rodent-Proofing Materials and Products 2026 - it covers what actually keeps mice and rats out in 2026, not just what worked in the past.
Essential Tools and Materials for Rodent Exclusion
The right materials make all the difference. Amateur fixes - like using foam alone - rarely hold up against determined rodents. Here’s what you’ll need to get serious about sealing your home.
Choosing the Right Sealants and Barriers
- Steel wool and copper mesh are your best friends for plugging holes - mice hate chewing through metal fibers and usually give up.
- Silicone-based caulk stands up to weather and gnawing far better than latex caulks, which rodents can easily chew through.
- Hardware cloth (wire mesh) with 1/4-inch openings or smaller is the gold standard for covering vents and larger gaps. Anything bigger and mice can squeeze through.
Safety Gear and Inspection Tools
- Nitrile gloves and N95 masks protect you from droppings, urine, and dust - don’t skip these, especially if you’re cleaning up an active infestation.
- Bright flashlights and small inspection mirrors help you spot entry points in dark corners or behind obstacles.
- Ladders and telescoping poles let you access attic vents, soffits, and rooflines - areas where rodents often find hidden entry.
Inspecting Your Home for Rodent Entry Points
Rodents only need a 1/4-inch gap (about the width of a pencil) to get inside. Careful inspection is the foundation of any rodent exclusion strategy.
High-Risk Areas to Check First
- Utility penetrations - where pipes, cables, or HVAC lines enter the home - are often overlooked. Even professional contractors sometimes leave gaps here.
- Garage doors, vents, and crawl space covers usually have gaps at the edges. If you can see daylight or feel a draft, it’s big enough for a mouse.
- Rooflines, attic vents, and soffits should be checked - rodents climb surprisingly well and often target these spots.
How to Detect Hidden Gaps and Holes
- At night, shine a flashlight from inside your home toward exterior walls - if someone outside can see the light, that’s a gap rodents can use.
- Look for dirt buildup, droppings, or gnaw marks around suspect spots. These are telltale signs of frequent rodent traffic.
- Use a ruler or just a pencil - if the opening is wider than 1/4 inch, it’s a risk. Quarters and dimes work too for quick checks.
Step-by-Step Guide: How to Seal Out Mice and Rats
Rodent-proofing isn’t complicated, but it does require patience and attention to detail. Here’s a practical, step-by-step guide to sealing out mice and rats for good.
Step-by-Step Guide
Follow these steps to rodent-proof your home efficiently using modern best practices. This guide outlines key actions, expert tips, and important warnings to help you prevent rodent entry, safeguard your property, and maintain a pest-free environment.
Total Time
2 hours 45 minutes
Difficulty
Intermediate
Inspect Your Home’s Exterior
Examine your home's foundation, siding, and roofline for any gaps, cracks, or holes larger than 1/4 inch. Use a flashlight to check behind bushes and in shaded areas. Identifying all possible entry points is critical for effective rodent-proofing.
Pro Tips:
- Focus on areas where utility pipes enter the house.
- Look for gnaw marks or droppings, which indicate recent rodent activity.
- Check basement windows and crawlspace vents carefully.
Important Warnings:
- Do not skip hard-to-reach areas—overlooked gaps are a primary cause of ongoing infestations.
Required Tools:
- LED flashlight
- Notepad or inspection checklist
- Measuring tape
Seal All Entry Points
Seal identified gaps using rodent-resistant materials like 1/4-inch hardware cloth, steel wool, or silicone caulk. Apply sealant firmly and ensure no holes remain. Proper sealing prevents rodents from finding new ways inside.
Pro Tips:
- Use expanding foam in combination with steel wool for irregular gaps.
- Pay extra attention to corners and joints—these are common weak spots.
- Replace damaged weatherstripping on doors and windows.
Important Warnings:
- Avoid using only foam—rodents can chew through it unless combined with steel mesh.
- Wear gloves to prevent cuts from sharp metal mesh.
Required Tools:
- Steel wool
- Hardware cloth (1/4-inch mesh)
- Silicone caulk and caulking gun
- Utility knife
- Work gloves
Secure Doors and Windows
Install door sweeps on all exterior doors and ensure window screens are intact. Adjust thresholds so that gaps are less than 1/4 inch. This step blocks common access points used by mice and rats.
Pro Tips:
- Metal door sweeps last longer than vinyl options.
- Check garage doors for gaps along the bottom edge.
- Inspect screen frames for bent or loose edges.
Important Warnings:
- Leaving even a small gap under doors can allow rodents inside.
- Do not use adhesive-only sweeps—they detach over time.
Required Tools:
- Metal door sweeps
- Screwdriver or drill
- Replacement window screens
- Measuring tape
Eliminate Food and Water Sources
Store all food in airtight containers and clean up crumbs immediately. Empty pet dishes overnight and repair leaky pipes to remove water access. Removing attractants cuts off key reasons rodents invade homes.
Pro Tips:
- Use thick plastic or metal containers for dry goods.
- Clean under appliances weekly to remove hidden crumbs.
- Empty sink strainers every evening.
Important Warnings:
- Do not leave pet food out overnight—rodents are most active after dark.
- Ignoring plumbing leaks provides a constant water source for pests.
Required Tools:
- Airtight food storage containers
- Paper towels or cleaning cloths
- Pipe wrench (for minor plumbing fixes)
Reduce Outdoor Attractants
Trim back vegetation at least 18 inches from exterior walls and clean up yard debris such as woodpiles or leaf litter. Store firewood at least 12 inches off the ground and away from the house. This limits rodent harborage near entry points.
Pro Tips:
- Keep garbage bins sealed with tight-fitting lids.
- Remove bird feeders or place them 20+ feet from the house.
- Install gravel strips along foundations to deter burrowing.
Important Warnings:
- Overgrown shrubs provide hidden access for rodents—trim them regularly.
- Stacking items against exterior walls creates nesting spots.
Required Tools:
- Pruning shears
- Rake
- Outdoor garbage bags
- Shovel
Monitor and Maintain Regularly
Inspect sealed areas monthly for new gaps or signs of gnawing. Reset traps if needed and refresh outdoor cleanup at least once per season. Ongoing monitoring is essential to prevent future infestations.
Pro Tips:
- Document inspection dates to track maintenance.
- Use motion-activated cameras to check for rodent activity if issues persist.
- Check attic and basement corners for nesting materials.
Important Warnings:
- Neglecting ongoing maintenance can result in recurring rodent problems.
- If you find evidence of a serious infestation, contact a licensed pest control professional.
Required Tools:
- Inspection checklist
- Replacement caulk or mesh (for repairs)
- Flashlight
Sealing Small Gaps and Cracks
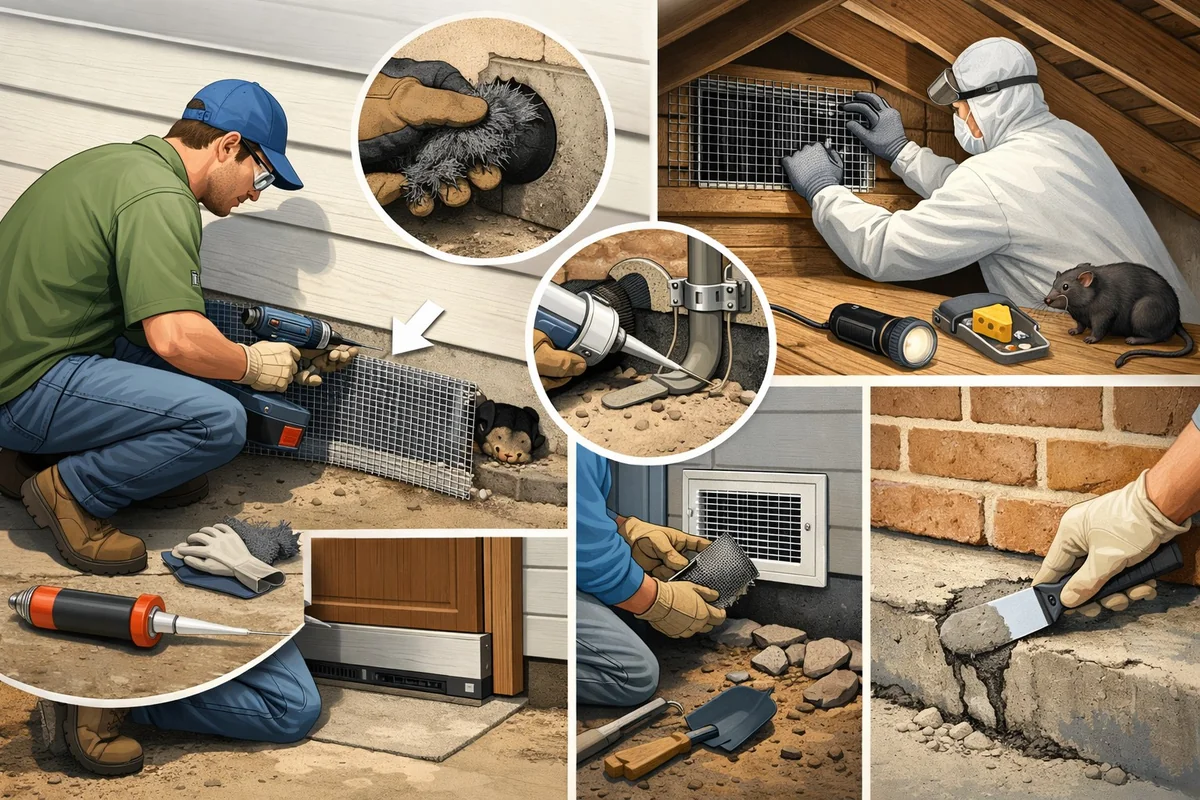
Start with any gap or crack smaller than a golf ball. Pack steel wool or copper mesh tightly into the opening - it should feel firm and spring back if you poke it. Then, seal over the mesh with silicone-based caulk to keep it in place and weatherproofed.
Expanding foam by itself is not enough - rodents chew right through it, often within days. Focus on spots behind appliances, under sinks, and around utility lines - these are high-traffic areas for rodents but easy to miss.
Blocking Larger Openings and Vents
Cover vents, crawl space doors, and any opening larger than a golf ball with 1/4-inch hardware cloth. Cut the mesh to size, making sure it extends at least an inch beyond the opening on all sides. Secure it with screws or heavy-duty staples; don’t rely on glue or tape.
If vent covers are damaged, replace them with rodent-resistant models - cheap plastic ones are a waste of money in the long run. Properly installed hardware cloth is nearly impossible for rodents to breach.
Reinforcing Doors and Windows
Install door sweeps so they touch the threshold - even a 1/4-inch gap under a door is an open invitation. For garage doors, weatherstripping should run the full length of the bottom edge.
Check window frames for gaps and add weatherstripping where needed. If rodents have already started gnawing at a door base, add a metal kick plate - this makes chewing almost impossible for mice and rats.
Eliminating Attractants: Food, Water, and Shelter
Sealing entry points only works if you make your home less appealing to rodents. They’re after food, water, and a safe place to nest - remove these, and you cut the odds of repeat invasions.
Securing Food and Waste Indoors
- Store all food in metal or thick plastic containers with tight-fitting lids - cardboard boxes and thin plastic bags are no match for mouse teeth.
- Wipe up crumbs and spills right away, especially in kitchens and pantries. Even a few crumbs under the fridge can keep a mouse coming back.
- Don’t leave pet food out overnight - this is one of the top attractants for mice and rats. Feed pets on a schedule and store food securely.
Reducing Outdoor Rodent Habitat
- Keep firewood, lumber piles, and compost bins at least 20 feet from your house. These make perfect nesting and hiding spots.
- Trim bushes, shrubs, and grass around your foundation - rodents love cover and hate traveling across open ground.
- Seal outdoor garbage and recycling bins with locking lids. If you notice gnaw marks or chewed plastic, switch to metal cans.
Common Mistakes and How to Avoid Them
Even experienced DIYers sometimes make errors that let rodents slip through. Avoid these pitfalls for the best shot at a rodent-free home.
Relying Only on Traps or Poison
Traps and poisons might catch or kill a few rodents, but they don’t address the main issue - new mice and rats will keep coming in if you leave entry points open. Worse, rodenticide use indoors puts pets and kids at risk, and can leave you with dead rodents in hard-to-reach places, creating odor and secondary pest problems.
Using Inadequate Materials or Techniques
Spray foam and plain caulk alone are easily chewed through - always combine them with metal mesh for lasting results. Overlooking attic, roof, and crawl space entry points leaves major vulnerabilities, especially in older homes.
Don’t forget to check behind appliances, inside utility closets, or in little-used rooms - these are favorite spots for rodents and often go uninspected.
When to Call a Professional Exterminator
Most rodent problems can be solved with DIY exclusion, but sometimes the scale or complexity calls for an expert. Here’s when you should bring in a professional.
Situations Beyond DIY Control
- Severe infestations - if you’re finding dozens of droppings daily or see rodents during the day, you may have a large, established colony needing professional remediation.
- Significant structural damage, like chewed wiring or insulation, often requires licensed repair to meet code and safety standards.
- Repeated failures after thorough exclusion efforts suggest hidden entry points or inaccessible nests - an exterminator can track these down with specialized tools.
What to Expect from Professional Services
- Professionals use advanced inspection methods - think thermal imaging cameras and tracking dust - to find nests and hidden entry points.
- Licensed exterminators can handle hazardous cleanup and ensure legal compliance, which is especially important for renters and multi-unit dwellings.
- Service costs typically range from $300 to $1,500, depending on home size and severity of infestation.
Frequently Asked Questions About Rodent Exclusion
❓ Frequently Asked Questions
What is rodent-proofing a home?
What is rodent-proofing a home?
Rodent-proofing a home means making it difficult or impossible for mice and rats to enter by sealing gaps, repairing damage, and removing attractants. This helps prevent infestations and damage. For example, sealing cracks around pipes and doors keeps rodents out while reducing future pest control costs.
How do I rodent-proof my home?
How do I rodent-proof my home?
To rodent-proof your home:
- Inspect for entry points around doors, windows, pipes, and vents.
- Seal gaps larger than 1/4 inch with steel wool and caulk.
- Install door sweeps and repair damaged screens.
- Store food in sealed containers.
- Remove outdoor clutter and trim vegetation.
Regularly check for new gaps to maintain protection.
What materials are most effective for sealing rodent entry points?
What materials are most effective for sealing rodent entry points?
For sealing rodent entry points, experts recommend:
- Steel wool: resists gnawing and fits small gaps
- Metal flashing: durable for larger holes
- Hardware cloth (1/4-inch mesh): blocks access in vents
- Silicone or polyurethane caulk: seals gaps tightly
Avoid relying on foam alone, as rodents can chew through it; combine with metal barriers for best results.
How often should I inspect my home for rodent entry points?
How often should I inspect my home for rodent entry points?
Inspect your home for rodent entry points at least twice a year - ideally in spring and fall, when rodents seek shelter. Check after severe weather, renovations, or pest activity. Frequent inspections help catch damage early and maintain effective barriers against infestations.
What are the most common signs of a rodent infestation?
What are the most common signs of a rodent infestation?
Common signs of a rodent infestation include:
- Droppings near food or along walls
- Gnaw marks on wood, wires, or food packaging
- Scratching noises in walls or ceilings, especially at night
- Nests made of shredded materials
- Musty odors in hidden areas
Prompt action is important to prevent health risks and property damage.
What should I look for when choosing rodent-proofing products?
What should I look for when choosing rodent-proofing products?
When choosing rodent-proofing products, consider:
- Material durability: metal lasts longer than plastic
- Ease of installation: DIY-friendly options save time
- Weather resistance: prevents breakdown outdoors
- Mesh size: 1/4-inch or smaller blocks rodents
- User reviews: highlight real-world performance
Choose products rated for your climate and check for proven effectiveness.
Why do rodents keep returning to my home even after sealing?
Why do rodents keep returning to my home even after sealing?
Rodents may return if all entry points aren’t sealed or if attractants like food, water, or clutter remain. Even small gaps (1/4 inch) allow mice inside. Check for hidden holes in basements, attics, or garages, and maintain cleanliness. Persistent issues may require professional inspection for overlooked access points.
Key Takeaways for Lasting Rodent Exclusion
Long-term rodent-proofing isn't a one-and-done job. Regular maintenance and vigilance - especially during fall and winter - keep your home protected year after year. Make a habit of re-inspecting for new gaps and reapplying sealants as needed.
Document what you’ve done and when - it helps you spot patterns and recurring trouble spots. If you ever feel overwhelmed, it’s worth getting a professional assessment to ensure nothing is missed.
With the right materials, a careful inspection, and a willingness to seal every gap (not just the obvious ones), you can keep rodents out for good. Peace of mind is well worth the effort.
Related Articles

Best Rodent-Proofing Materials and Products 2026: Steel Wool, Mesh, Kits, and More
Find the best rodent-proofing materials, products, and exclusion kits for 2026. Compare steel wool, mesh, sealants, vent covers, and natural deterrents to keep your home rodent-free with expert DIY recommendations.

Best Rat Traps and Baits 2026: Top Picks for Every Infestation
Find the best rat traps and baits of 2026 for fast, safe, and affordable DIY rat control. Compare top snap, electric, live-catch, poison, and natural products to eliminate rats from your home.

Best Mouse Traps and Repellents 2026: Top Picks for Home Mouse Control
Discover the best mouse traps and repellents for 2026. Compare snap, electric, live-catch, bait stations, and natural solutions to control mice safely and effectively at home.

Complete Guide to Pest Prevention in Homes: Stop Pests in 2026
Protect your home in 2026 with this complete pest prevention guide. Discover proven DIY methods, room-by-room tips, safe solutions for families, and expert advice to stop pests before they start.