
How to Seal Gaps and Cracks to Keep Rodents Out: Rodent Proof Sealing Guide
Learn how to seal gaps and cracks to keep rodents out of your home in 2026. Step-by-step rodent proof sealing guide with tips, materials, and common mistakes to avoid for lasting protection.
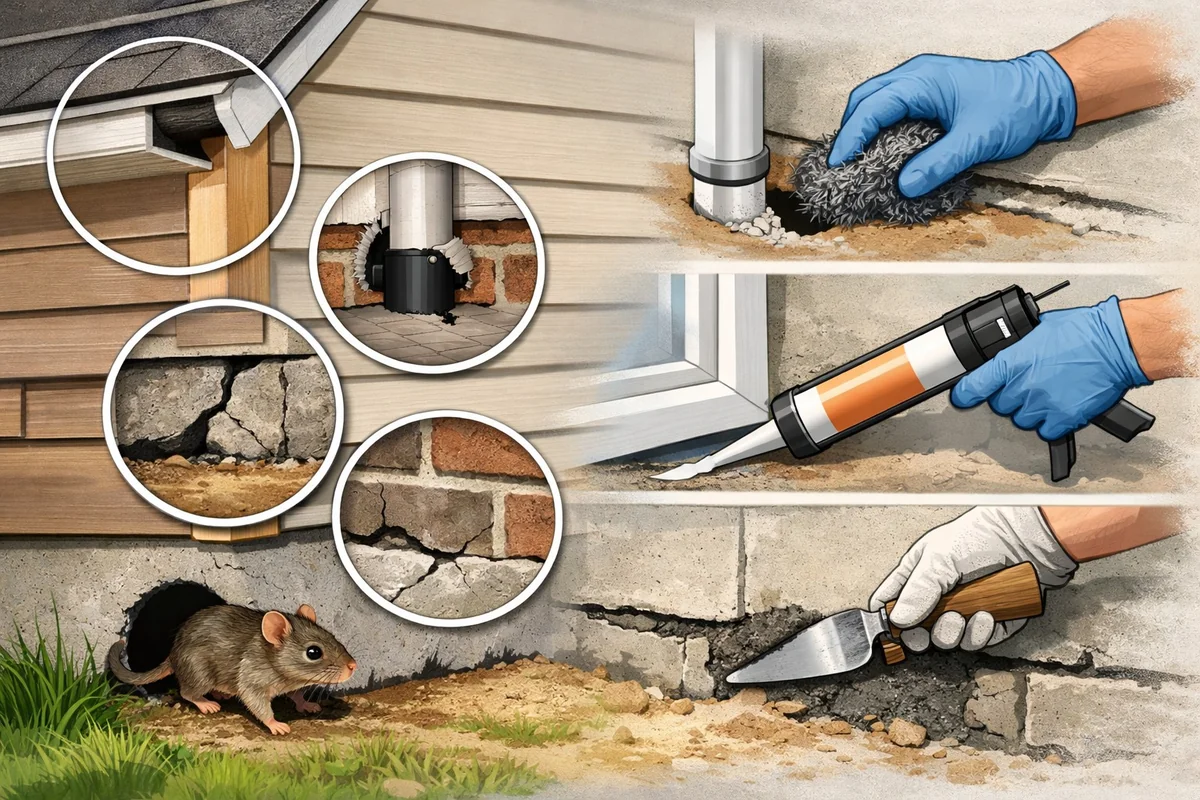
To seal gaps and cracks to keep rodents out, inspect your home for entry points, clean and dry the area, then fill holes using steel wool, copper mesh, or metal flashing secured with caulk or pest-resistant foam. Most DIYers complete this in 1-2 hours for a small home. Careful material choice is key for lasting results.
Why Rodents Target Gaps and Cracks
Rodents don’t just wander into your home by chance - they actively seek out weaknesses. Mice can slip through openings as small as 1/4 inch, while rats only need a 1/2 inch gap. Their flexible bodies and strong teeth make even tiny holes a potential front door.
What draws them in? Warmth, food, and shelter. Rodents are constantly searching for cozy spaces, especially in colder months or after heavy rain.
They’re not like insects that passively drift in - rodents will gnaw at wood, plastic, and even soft mortar to widen a crack if they sense opportunity.
Our analysis shows that certain areas are almost always weak spots. Foundation cracks, places where cables or pipes enter your home, and worn weather seals at doors should be your first targets. Older homes develop new gaps as they settle, and DIY repairs can leave behind unsealed holes that only become more attractive over time.
If you’re looking for a complete overview of prevention strategies, check out our Rodent-Proofing & Prevention guide for more context.
How to Find Rodent Entry Points
Finding where rodents get in is half the battle. A good flashlight and a systematic approach make a huge difference. Shine light along baseboards, behind appliances, and around the outside foundation - look for spots where daylight pokes through or shadows reveal crevices.
Grease marks, droppings, or gnawing are clear signs that a hole is being used.
Some of the most overlooked locations are attics, crawl spaces, and behind large appliances. Utility lines - think gas, water, and electrical - are notorious for having gaps around their entry points. Don’t skip garage doors and basement windows; these are classic rodent highways, especially if the seals are worn or the frame is rotting.
Don’t rely on sight alone. If you can fit a pencil into a gap, a mouse can fit too. Sprinkle talcum powder or flour on the floor near suspicious areas - tiny footprints in the morning confirm you’ve found an active route. If you suspect a spot but can’t see direct evidence, set up a sticky trap or camera overnight for confirmation.
For a deeper look at the tools and materials that actually work, see our Best Rodent-Proofing Materials and Products 2026 review.
| Method | ★Difficulty Level | ★Time Required | Cost Range | ★Best For | Effectiveness |
|---|---|---|---|---|---|
| Steel Wool and Caulk Sealing | Medium | 2-4 hours per 1000 sq ft | Budget | General home gaps, beginners and DIYers | High |
| Wire Mesh (Hardware Cloth) Barriers | Hard | 4-6 hours per 1000 sq ft | Moderate | Large holes, crawl spaces, advanced users | Very High |
| Expanding Foam Sealant | Easy | 1-2 hours per 1000 sq ft | Budget | Quick fixes, small cracks, basic maintenance | Moderate |
| Mortar or Cement Patching | Hard | 6-8 hours per 1000 sq ft | Premium | Permanent sealing of masonry or foundation gaps | Excellent |
Choosing the Right Materials for Sealing
Not all sealing materials are created equal - rodents can chew through most soft fillers, so you need something they can’t easily defeat. Steel wool and copper mesh are staples because metal fibers resist gnawing. Copper mesh is the best bet for exterior or damp areas since it won’t rust like steel wool.
That said, steel wool is still effective for dry, indoor gaps but should be checked every year or two for corrosion or displacement.
Expanding foam is popular with DIYers because it fills irregular spaces quickly. The catch is, rodents can chew through basic foam just as easily as they chew through wood. Look for pest-resistant formulations - these have additives or denser structure that makes them less appealing and harder to penetrate.
Caulk works well for small cracks, especially at joints or seams, but it’s only a surface-level barrier. A determined mouse will gnaw through standard silicone or latex caulk eventually.
For larger holes or recurring problem areas, galvanized metal flashing and hardware cloth (1/4 inch mesh) are the gold standard. Flashing offers a permanent, chew-proof barrier for holes in siding or foundations. Hardware cloth is ideal for vents or areas where you need airflow but not rodent access.
Installation is a bit more involved - you’ll need tools to cut and secure it, and it may not be allowed in some rental units. Weigh the level of infestation and permanence you’re after before choosing.
Essential Tools and Safety Precautions
Before you start sealing, gather the right tools. Most jobs require a utility knife, caulking gun, gloves, and wire cutters. If you’re working up high or in awkward spots, a ladder or step stool is a must.
Always use protective eyewear when cutting metal mesh or working overhead to avoid injury.
Gloves aren’t just for comfort - they protect you from sharp materials and contaminated surfaces. If you’re cleaning up droppings or nesting material, wear a mask and work slowly to avoid stirring up dust. Rodent debris can carry hantavirus and other serious pathogens, especially in attics and crawl spaces. Wash your hands thoroughly after any contact.
Handle materials like foam and caulk according to manufacturer instructions - some contain irritants and need ventilation during use. Dispose of old nests and droppings safely, using double bags if possible. Keep kids and pets away from wet foam or caulk until it’s fully cured and safe to touch.
Step-by-Step Guide to Sealing Gaps and Cracks
Once you’ve located entry points and gathered supplies, sealing is straightforward but requires attention to detail. Clean, dry, and disinfect each area before sealing to ensure adhesion and reduce health risks. Remove any loose debris or nesting material, and make sure the surface is dry - otherwise, you risk mold growth or a failed seal.
Stuff steel wool or copper mesh tightly into any hole bigger than a pencil. Make sure there are no gaps left - rodents will exploit even a small opening. Secure the mesh in place with caulk or pest-resistant foam to keep it from being pushed out by persistent gnawing.
Trim mesh with wire cutters for a flush fit and tuck in sharp edges so they’re not exposed.
For large, irregular gaps, use expanding foam. Overfill slightly since the foam will shrink as it cures, then trim off any excess with a utility knife. Caulk is best for narrow cracks and seams; apply a continuous bead and smooth it into the joint for an airtight seal.
Always allow the recommended curing time before painting or exposing to moisture.
When dealing with bigger holes, cut your metal flashing or hardware cloth to overlap the edges by at least 1 inch. Attach it with screws or masonry anchors - adhesives alone won’t hold up for structural gaps. Inspect outdoor barriers every season for rust or loosening, especially after storms or heavy weather.
Step-by-Step Guide
Seal gaps and cracks to keep rodents out of your home using proven exclusion techniques. This guide walks you through identifying, preparing, and sealing entry points following current pest management best practices.
Total Time
1 hour 40 minutes
Difficulty
Intermediate
Inspect Your Home for Rodent Entry Points
Walk around your home’s exterior and interior. Look for gaps, cracks, and holes larger than 1/4 inch, especially near pipes, vents, foundations, and doors. Mark each spot clearly for sealing. This ensures you target all potential rodent access points.
Pro Tips:
- Check behind appliances, under sinks, and along the foundation.
- Use a flashlight and mirror to see into tight spaces.
- Common mistake: Overlooking garage door edges and attic vents.
Important Warnings:
- Wear gloves and a dust mask when inspecting dirty or enclosed areas.
- Rodents can squeeze through surprisingly small gaps—seal anything over 1/4 inch.
Required Tools:
- Flashlight
- Measuring tape
- Notepad or marking chalk
- Protective gloves
- Dust mask
Clean and Prepare All Surfaces
Remove debris, dust, and loose materials from the identified gaps using a wire brush or vacuum. Dry the area thoroughly. This step ensures proper adhesion of sealants and longer-lasting results.
Pro Tips:
- Use a stiff brush for stubborn dirt or old sealant residue.
- Vacuum loose debris to prevent sealant contamination.
- Damp surfaces reduce sealant effectiveness—dry fully before sealing.
Important Warnings:
- Do not apply sealant to wet or greasy surfaces—it won’t bond properly.
- Wear eye protection if brushing overhead or in confined spaces.
Required Tools:
- Wire brush
- Vacuum cleaner
- Clean cloths
- Eye protection
Seal Large Gaps and Holes with Steel Wool and Expanding Foam
Fill gaps over 1/2 inch wide with tightly packed steel wool, then cover with rodent-resistant expanding foam. This combination blocks rodents and deters chewing. Ensure the steel wool is fully covered to prevent rusting.
Pro Tips:
- Use stainless steel wool to resist rust and extend durability.
- Push steel wool firmly into gaps before applying foam.
- Trim excess foam after it cures for a neat finish.
Important Warnings:
- Do not use plain foam alone—rodents can chew through it.
- Wear gloves when handling steel wool to avoid cuts.
Required Tools:
- Stainless steel wool
- Rodent-resistant expanding foam (polyurethane or similar)
- Utility knife
- Protective gloves
Seal Small Cracks and Gaps with Caulk or Mortar
Apply silicone caulk or mortar to cracks under 1/2 inch wide. Smooth the sealant with a caulking tool for a tight, professional finish. Proper sealing prevents rodents from exploiting smaller openings.
Pro Tips:
- Use silicone-based caulk for flexibility and weather resistance.
- Mortar is best for masonry or brick surfaces.
- Smooth caulk with a damp finger or tool for a tight seal.
Important Warnings:
- Check manufacturer’s instructions for cure times before exposing to moisture.
- Do not block necessary ventilation openings—use rodent-proof mesh instead.
Required Tools:
- Silicone caulk or mortar
- Caulking gun
- Caulking tool or putty knife
- Damp cloth
Install Rodent-Proof Mesh on Vents and Openings
Cut hardware cloth (1/4 inch mesh) to size and securely attach it over vents, utility openings, and crawlspace access. Fasten with screws or heavy-duty staples. This blocks rodents while allowing airflow.
Pro Tips:
- Measure openings precisely for a snug fit.
- Use galvanized or stainless steel mesh for weather resistance.
- Seal mesh edges tightly to prevent rodent entry around the sides.
Important Warnings:
- Always wear gloves—hardware cloth edges can be sharp.
- Do not use plastic mesh; rodents can chew through it easily.
Required Tools:
- 1/4 inch hardware cloth (galvanized or stainless steel)
- Tin snips
- Work gloves
- Screws or heavy-duty staples
- Screwdriver or staple gun
Inspect and Maintain Sealed Areas Regularly
Check all sealed entry points every 3-6 months for new gaps or signs of gnawing. Reapply sealant or mesh if damaged. Routine maintenance ensures long-term rodent exclusion.
Pro Tips:
- Schedule inspections at the start of spring and fall.
- Keep a checklist of sealed locations for future reference.
- Pro tip: Check after severe weather or home repairs.
Important Warnings:
- Ignoring maintenance leads to recurring rodent problems.
- If you find extensive damage or infestation, consult a licensed pest professional.
Required Tools:
- Flashlight
- Notepad or checklist
- Replacement sealant or mesh (if needed)
Common Mistakes and How to Avoid Them
The biggest mistake is trusting foam or caulk alone. Standard versions are no match for rodent teeth and give a false sense of security. Soft materials like insulation or fabric not only fail to stop gnawing - they can actually attract rodents looking for nesting material.
Another error is using mesh with holes larger than 1/4 inch; mice will wriggle right through.
Many people focus only on visible gaps, missing hidden or secondary entry points in attics, basements, or above drop ceilings. Even if you seal the main area, rodents often find new ways in if you don’t inspect thoroughly. It’s also easy to forget to check your work periodically - rodents are persistent, and a small failure can undo your progress.
Finally, never seal all exits if you suspect rodents are still inside. This traps them, leading to gnawing, foul odors, and sometimes even dead animals in your walls. If you see droppings or hear activity, use traps or monitoring devices and plan a staged sealing process until you’re sure the house is clear.
Tips for Long-Term Rodent Prevention
Sealing gaps is a great start, but long-term success means staying vigilant. Set a seasonal schedule to inspect for new cracks - especially after major weather events or any renovation work. Replace weatherstripping and door sweeps each year to maintain tight seals.
Keep a log of problem areas so you know where to look every time.
Don’t forget exterior factors. Remove food sources and clutter near the foundation, trim back bushes and tree limbs, and keep trash bins tightly sealed. Using traps or deterrents in known trouble spots adds an extra layer of defense.
For more on integrated prevention, see our main Rodent-Proofing & Prevention resource.
If you keep patching holes but still have rodents, it may be time to call in a pro. Large structural gaps, repeated infestations, or multi-unit buildings are tough to fix with DIY measures alone. Pest control experts have the gear and know-how to spot hidden entry points and use materials that last longer in harsh conditions.
Frequently Asked Questions About Rodent Proof Sealing
❓ Frequently Asked Questions
What is rodent proof sealing?
What is rodent proof sealing?
Rodent proof sealing is the process of closing gaps, cracks, and openings in a building to prevent rodents from entering. This method helps protect your home from infestations and property damage. Common materials include steel wool, caulk, and metal flashing for blocking access points.
How do I seal gaps and cracks to keep rodents out?
How do I seal gaps and cracks to keep rodents out?
To effectively seal gaps and cracks to keep rodents out:
- Inspect your home’s exterior and interior for openings larger than 1/4 inch.
- Clean and dry the area around each gap.
- Fill holes with steel wool or copper mesh, then cover with caulk or expanding foam.
- Use metal flashing for larger holes.
Check regularly for new openings.
What materials are best for sealing rodent entry points?
What materials are best for sealing rodent entry points?
The most effective materials for sealing rodent entry points are:
- Steel wool: blocks rodents from chewing through
- Copper mesh: rust-resistant and flexible for tight spaces
- Metal flashing: ideal for larger gaps
- Silicone or exterior-grade caulk: seals around mesh or wool
Avoid using materials like plastic or foam alone, as rodents can chew through them.
How often should I inspect my home for gaps and cracks?
How often should I inspect my home for gaps and cracks?
Most experts recommend inspecting your home for gaps and cracks every 6 to 12 months. Seasonal changes can cause new openings to appear, especially around doors, windows, and the foundation. Regular inspections help catch vulnerabilities early and prevent rodent infestations before they start.
What are the signs that rodents are entering through gaps?
What are the signs that rodents are entering through gaps?
Common signs that rodents are entering through gaps include:
- Droppings near baseboards or corners
- Gnaw marks on wood or plastic
- Grease or smear marks along walls
- Scratching sounds in walls or ceilings
If you notice these indicators, inspect for new openings and seal them immediately.
What should I look for when choosing rodent proofing products?
What should I look for when choosing rodent proofing products?
When choosing rodent proofing products, focus on:
- Durability: metal mesh or steel wool resists chewing
- Weather resistance: products should withstand moisture and temperature changes
- Ease of application: choose products suitable for your skill level
- Compatibility: ensure materials fit the size and location of gaps
Review user feedback before purchasing.
Why do I need to seal small gaps if they seem insignificant?
Why do I need to seal small gaps if they seem insignificant?
Sealing even small gaps is essential because rodents can squeeze through openings as small as 1/4 inch. Leaving minor cracks unsealed creates entry points, increasing the risk of infestation and damage. Industry guidelines recommend sealing all potential access points, regardless of size, for effective rodent prevention.
Key Takeaways for Effective Rodent Proofing
Thorough inspection and the right materials make all the difference for rodent-proof sealing. Use metal-based barriers for any gap bigger than a pencil and combine them with pest-resistant foam or caulk for a long-lasting, layered defense. Sanitation and regular monitoring are just as important as the initial seal - don’t treat this as a one-and-done project.
If you seal gaps and still see signs of rodents, escalate to traps or consult a pest professional. Persistent problems often point to hidden vulnerabilities or missed spots. Document your actions and communicate with landlords or property managers if you’re renting - this protects you and makes follow-up easier.
With a focused approach, most homeowners and renters can seal out rodents for good. Don’t wait for the next infestation - take action now and enjoy a healthier, pest-free living space.
Related Articles

Best Rodent-Proofing Materials and Products 2026: Steel Wool, Mesh, Kits, and More
Find the best rodent-proofing materials, products, and exclusion kits for 2026. Compare steel wool, mesh, sealants, vent covers, and natural deterrents to keep your home rodent-free with expert DIY recommendations.

Best Rat Traps and Baits 2026: Top Picks for Every Infestation
Find the best rat traps and baits of 2026 for fast, safe, and affordable DIY rat control. Compare top snap, electric, live-catch, poison, and natural products to eliminate rats from your home.

Best Mouse Traps and Repellents 2026: Top Picks for Home Mouse Control
Discover the best mouse traps and repellents for 2026. Compare snap, electric, live-catch, bait stations, and natural solutions to control mice safely and effectively at home.

Complete Guide to Pest Prevention in Homes: Stop Pests in 2026
Protect your home in 2026 with this complete pest prevention guide. Discover proven DIY methods, room-by-room tips, safe solutions for families, and expert advice to stop pests before they start.